Showing posts with label Environment Work. Show all posts

Friday, 21 February 2014

Tower Project


Having a break from major project at University I decided that I would look into how to unwrap buildings in a proper fashion and to games industry standard. For this I followed a very easy step by step guide tutorial done by Digital Tutors an online tutoring company.

They started me off by going through some of the basic tools found within 3DS Max 2014 as I have previously had problems unwrapping in this edition of the software and most of the time reverted back to the 2013 edition to get my outcomes.


By starting to unwrap a basic sword it was nice and simple and was able to give me the chance to get used to the tools. Something I've never really used when unwrapping which noticed is of great importance is the relax by face angels. The tools used was a simple but effective way to unwrap this object. (Planar, Cylinder, Break and Stitch)


The next stage of the tutorial was going through how to unwrap a rock. This was simple and easy to follow giving me the knowledge to create my own rocks and unwraps for my major project in the near future. The technique used was mentioned as the tennis ball effect where the white strip of the ball becomes the seam-line on the unwrap.


The next stage in development of personal skills was learning how to unwrap for normal mapping and how to ensure your normal maps work effective and efficient. Digital Tutors show a few different techniques on how to solve the issues. The more efficient way for this object was to add in a few extra edge loops. Also another technique shown was smoothing groups, these are very useful when making assets for games as it allows the user to smooth the mesh without changing topology. This was very helpful section as I knew what smoothing groups were I just didn't fully understand how to go about using them until now.   


Finally got to unwrapping the tower. Even though I am comfortable in the unwrapping process I wanted to see if there was anyway I could speed up my process and see where I might of missed out on. With the main tower itself I learned many processes such as being able to unwrap the main brickwork I would of simply applied a cylindrical mapping to it and map it fit, however as this was a atlas map I couldn't do that but learned by creating multiple seams and over laying them it allows the texture to tile perfect.

Another new technique I learned was unwrapping the top of a cylinder like object as usually the process I would of used was to simply select all the top faces and applied a planar map to it. However the new technique learned for situations like this is to break down the cylinder into quarters and overlapping them as shown in the image above this makes it so that the texture is more crisp and higher resolution.     


Throughout the whole project I used the tiled option found within the UV editor to create my UV's this helped me to make quick selections and ensure a clean UV once completed I then compacted the UV's back to the 1 to 1 space and then removed the tiled option from the editor. The left image shows the unwrap compacted down. I then learned that you can copy and paste UV unwrap modifiers so as the windows was the same mesh I could do this then afterwards edited them to make up the window. But at least most of the work was done for me.


This image shows the unwrap of one of the wooden structures this was very simple to unwrap. Once I done one I simply just duplicated it around the tower itself.
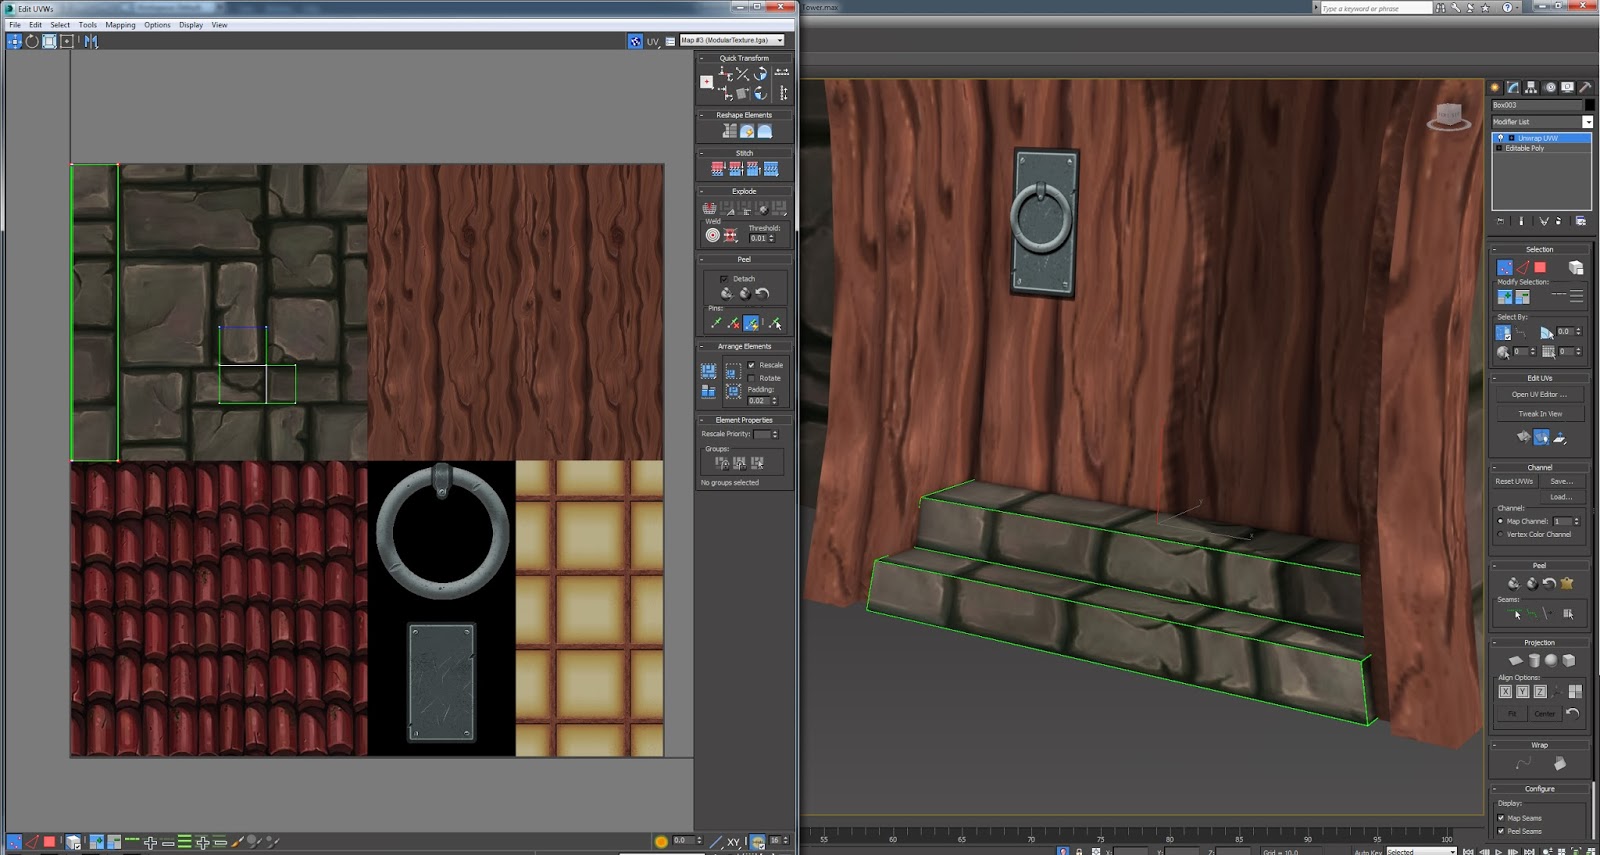


Finally I added some steps and unwrapped them as shown in the image. I also added two planes for the alpha mapped handle.

Tuesday, 11 February 2014

Jacksonville Jaguars Locker Room

For a project at University we where given the task to create a low poly environment and a character bust both related to the same theme. There was a limit of 7500 Triangles for the environment and 12000 Triangles for the character bust. The project itself was broken down into two parts one was the environment and had to have a particular theme. These themes was given to use by the lecturer to chose from.

Create and texture a building from a licensed property that fits within defined technical parameters for
a game engine.

Choose one from the list and develop.

An urban alleyway from a gangster movie. E.g. Goodfellas, Reservoir Dogs, The French
Connection.

The American Wild West. E.g. Red Dead Redemption, Six guns, Unforgiven.

A sports arena. FIFA, NASCAR, NHL hockey.

For this project I wanted to work on a sports themed environment and decided to work not on a stadium but focus more on behind the scenes in a sense and create a locker room.

For this I looked at many different sporting events to find the right one from football (Soccer), American Football (NFL) and Ice Hockey (NHL).

I managed to find the perfect environment which was the Jacksonville Jaguars locker room as its new 3 million Dollars made it the new and improved way of getting ready before the big games.

Found Below are some part of the document stage where I gathered some useful reference images for me to work from.


Production Stage Begins!!!!!!!

So To begin I Started Blocking the Textures in 3DS Max Making sUre that the Normal Maps and Spec Was working correctly within the package.


This Image Shows the Material setup I used for the Scene as you can see I created Material ID's for certain Objects this was so that different parts of the object could have different Textures for it to react to. For example The locker itself was made up of 3 Material ID's
1. Wood
2. Metal
3. Glow


After this I thought I would experiment with implementing some of my objects into the already created scene within the CryEngine Package. For me to do this I first had to create a Dummy for the Object and link them together, This was so that the Object had a easy assemble Pivot Point within the Engine. Secondly I had to use the CryEngine Exporter in 3DS Max to Export my mesh using the correct settings. Thirdly I needed to export my textures in the correct manner using the CryTiff plugin for PhotoShop.


These next set of Images shows the wire frames of the overall Scene and close up shots of areas that have key feature within the overall scene. 


The Next set of images shows the build up of the light setup used within the scene.


No Lights Has a HDRI Light Map for the sky light 


Added in the light source from the blue Emissive parts found in the lockers to add a much more realistic feel.


This was a test shot I did. I added a directional light on the side and rotated it round. I was unhappy with that choice of angel but however kept the light source. 


This Image shows a Screen grab of the scene in Marmoset 2, showing how I have created a range of light sources to mimic the light objects in the scene.


After creating the main light sources for the scene I recreated the directional light kept the brightness to a minimum making sure its purpose was just to ensure the dark areas of the scene wasn't completely blacked out.

 These Images Show render tests of the lockers with all texture sheets applied ( Diffuse, Normal, Specular and Emissive)  With the use of the blue light it helped make the lockers stand out more.


 After finishing the locker section of the scene I moved on to finishing adding in the textures to the rest of the scene. Images below show the overall scene lit and then followed again by close up shots of key areas.


Finally Here are the Final Major Objects and the breakdown of the Textures used.


Final Triangle Count: 7499

Saturday, 8 February 2014

Wooden Toy Catapult

The first day back at University we was given a project to do within a few hours we must construct a wooden toy of some sort. The requirements where that we have a 1000 triangle count and texture sheet of one 512X512 texture Sheet.

I chose to create a toy Catapult as I thought. The image shows my final result of just a few hours work. The textures used was taken from online resources such as pinterest.