Through this project I have learned so much and even though I had on many occasions have to go back and forth with importing the car mesh as it had many technical issues such examples range from mesh topology, material ID or with either the light map or texture UV.
As I used a script for the first light map pass I found that it gave artifacts over the objects to solve this issue I found a simple way of copying the UV set for the textures to the light map set. This solved the issue I was getting.
This image is a prime example as I realised after importing the mesh that I would then need to create a multi sub object material for the door as this will eventually have 3 different shaders attached to it so from that I went back and amended the object.
From the technical issues I was having with the car mesh I also realised that I missed some key assets to the car model including an inside light and also a rear view mirror. The interior light was a duplicated mesh from the orange lights at the front of the car with a few edits made.
I used a mixture of texture software for this project mainly focusing on ddo and ndo with photoshop adjustments etc. after creating the seems of the bucket seat in Zbrush I exported the normal map and used that as a base as well as a ID and AO map for ddo. From completing the texture I imported the textures and created a basic PBR shader for the bucket seat. I soon came to dislike the textures I produced.
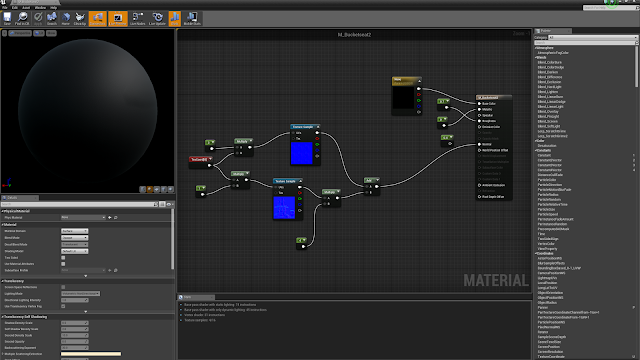
I used the skills I have learned throughout the project and decided to create a simple shader that emulates the effect I wanted to achieve. This was done using the original normal map from the sculpt I did of the bucket seat as well as the normal paint map. Them to blended together with a vertex colour node and simple constant node for roughness and metalness.
The Final effect of the bucket set can be seen above with the shader applied.
I also went back and finished off the harness texture as this was missing the logo sections of the object. As for the metal parts I used the metal master shader I created previously.


No comments:
Post a Comment