Monday, 27 June 2016

Garage Scene 2.0 Part 4


I then began to create the interior textures for the objects inside the car, once again I made a few mistakes, however I did learn them and will never do them again the major one not making sure that the ddo project was set for UE4. However one texture I will like to share with you is the carbon fiber one as done is from scratch in max through to PhotoShop and finally finishing in Unreal. 


This is the mesh I created within max as you can see its fairly basic done using a cylinder removing the unnecessary polys and moving/rotating into place. Once I done that I ensure that it was also tileable texture.


This image and text explains how I went about creating the process of the textures before going into unreal to build the shader.


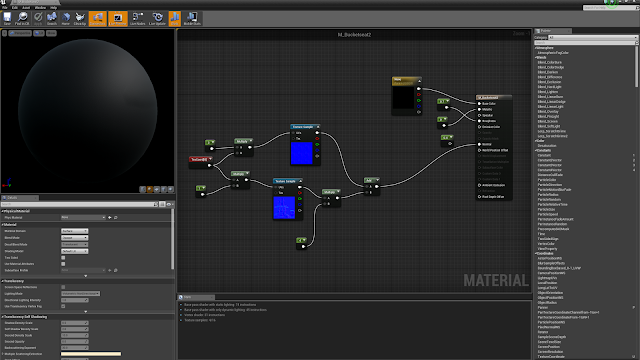
This shader was built up of three sections one the base to which I used my textures, then created a reflections mark and also reflections blending them together for the reflections I used a scene capture 
cube as well for realism.


This Image shows the shader applied to the objects.


The next in the check list for me to do was create the interior paint shader as I needed it to be slightly different to the exterior one as needed it to be more Matt in appearance. I also needed to add some fine details for this I created a normal and ao map in ndo. 


This Image shows the shader applied.


Another shader was made again for the doors as needed one with the same properties as the interior paint body but with out the normal and ao map.

Thursday, 23 June 2016

Garage Scene 2.0 Part 3

Through this project I have learned so much and even though I had on many occasions have to go back and forth with importing the car mesh  as it had many technical issues such examples range from mesh topology, material ID or with either the light map or texture UV.  

As I used a script for the first light map pass I found that it gave artifacts over the objects to solve this issue I found a simple way of copying the UV set for the textures to the light map set. This solved the issue I was getting. 


This image is a prime example as I realised after importing the mesh that I would then need to create a multi sub object material for the door as this will eventually have 3 different shaders attached to it so from that I went back and amended the object.


From the technical issues I was having with the car mesh I also realised that I missed some key assets to the car model including an inside light and also a rear view mirror. The interior light was a duplicated mesh from the orange lights at the front of the car with a few edits made.


I used a mixture of texture software for this project mainly focusing on ddo and ndo with photoshop adjustments etc. after creating the seems of the bucket seat in Zbrush I exported the normal map and used that as a base as well as a ID and AO map for ddo. From completing the texture I imported the textures and created a basic PBR shader for the bucket seat. I soon came to dislike the textures I produced.


I used the skills I have learned throughout the project and decided to create a simple shader that emulates the effect I wanted to achieve. This was done using the original normal map from the sculpt I did of the bucket seat as well as the normal paint map. Them to blended together with a vertex colour node and simple constant node for roughness and metalness.  


The Final effect of the bucket set can be seen above with the shader applied.


 I also went back and finished off the harness texture as this was missing the logo sections of the object. As for the metal parts I used the metal master shader I created previously.


Friday, 10 June 2016

Garage Scene 2.0 Part 2


From the basic setup I had created I was able to start adding depth and character to the scene. 


I started the process by adding the main element of the project the car model to the center of the room making it the main focus and also allow the player to freely move round the car with no issues like clipping etc. 

I then began the production of the shaders creating a range of gloss to Matt finished in white and black, while creating unique shaders for certain objects such as the floor and the wooden wall. I also managed to merge the old car shader from the old project into this one so I didn't have to start from scratch.


I then went onto creating metal like shaders for use of a range of objects one being a mater shader to which I created a range of instanced shaders. For the floor I created a marble texture/shader from an image offline creating a albedo,normal,gloss and ao maps.

After getting a more defined look of the garage I got rid of the quick light setup I created previously and developed a more polished feel to the environment. I scattered some sphere reflection captures around the room. While keeping to the realistic approach added a spot light to each of the light meshes in the roof.  

I also added a first person camera to the scene for use later on in the development.


I ended up tweaking the lights multiple times before getting the look I desired. I also went and redone the floor texture as I wasn't happy with the marble look and went with dark tiles to match the feel of the room more.


For the picture objects I kept to the theme of fast and furious. Gathering sources from online and uving them to the objects. As you can see I also moved some of the pictures around this was due to wanting to make use of the wall space and also better design in my opinion. 

I came back to the walls as well and created the dark grey shader I wanted for that side of the room.


I felt within the scene the garage doors looked plain and there wasn't much detail in terms of real life usage. I solved this by creating a rail system that slides the doors up and into the roof via the wooden curved slot. This was a design idea as did't want the rail system to look out of place to the rest of the scene by keeping it simple and clean.


I made sure I went into enough detail without going to crazy on the topology. 


This is what the rail system looks like in the unreal project with the rail system itself being a steel like material wile the above has two shaders with the inside being black for darkness and outside being the wooden wall shader.


Saturday, 14 May 2016

Garage Scene 2.0 Part 1


After finally finishing the modelling and texturing of the Ford Escort MK1. I decided to have a look back at the overall scene and decided I wasn't happy with the environment that the car would be set in. This was down to the purpose of the scene, It felt random like why would a shiny well looked after show car be in a run down american garage. For that reason I revisited the scene and began reconstructing it.

Went through loads of different ideas, however ended up sticking with the one below.


Firstly I brought in a combined mesh of the car to use as a template on size and placement within the scene.
I structured the garage using a modular approach ensuring that the measurements for objects such as the windows were the same all the way round etc. After finalising the concept and shape I moved onto adding the detail. By adding window frames and glass and doors leading to what would be the apartment and garden. 


Went about adding skirting boards using splines and loft function.


I added more detail to the roof trying to give more character to the scene and not just a plain flat roof. I also added a lot of spot lights as wanted to ensure the scene would be well light for real life purposes.


Ended up having to add some more modular walls in to either side of the front. This was due to the size of the garage doors. From that i was able to create again one door and duplicate it.


I wanted some objects on the wall to break up the emptiness and negative space. 


I also added a TV to the scene as wanted to have a video clip of some sort on a loop for the player to experience.

I went through and unwrapped both UV channels. One being for colour information and the other for light map. This was done using a script to auto generate the light map making a quicker process. From there I created material and material ID's for the scene.


As the room was created from a plane I need to shell the object and create an outer layer to create shadows correctly.


Once that was all done I used another plug-in script called TSTools to export all the meshes at once.


I added lights and simple materials as a base to work from.

Wednesday, 13 April 2016

EGX Creative Assembly GAME JAM 2016


I was luckily enough one of few people to get selected to take part in the event at EGX REZZED. I entered as a solo artist to which the team at Gamesindustry.biz and creative assembly staff selected my team mates. by fate I ended up with some really nice people.

Ross Anderson- Game Designer 
Haley Ashby- Programmer 
Andrew Stewart -Programmer
Emma Williamson - Artist
Andrew Pearce - Sound Designer

We decided to create a game using Game Maker as this was a piece of software that everyone's machine could run on the day. I was happy with the decision however I knew that it would resolve in me using my 2D / Drawing skills which are at a good standard but lack behind my 3D.   


I was given the task of creating the environment elements and other smaller elements in the game, While Emma focused on the character and shark. To begin with I created the musical notes created with and without a black outline as requested by the designer Ross From that I got given the task of the cassette tape which was an image taken online and then edited to fit the purpose needed. 

The major task handed to me was the clouds and for this I wanted to use my 3D skills and create something stylised. This was done by using 3DS Max and creating a range of different size spheres and rendering them out from Marmoset 2 as PNG's.  The finished collection is the image above. However the single elements didn't make it into the final game they were used to create back ground image.


From the clouds the team wanted me to create the background image and requested it had a pink/purple colour to it. I instantly thought of Bit trip runner 2. This was a challenge as I needed to create the gradient but also allow the image to title for the purpose of the game. After hard work and multiple times of trying I managed to get it done final result found above. 


The image above shows the rest of the elements created for the project which include the cassette tape,back ground image, Balloon Shark ( I created the balloon section while Emma Created the Shark), The Mines that sadly didn't make it to the game and finally the button icon UI elements.


This is the Title screen created by Emma using the background Image of the game.


Image of the gameplay.


Check out the video of the Game Jam.


Thursday, 3 March 2016

FF14 Fan Art #001


Started by creating rocks with the help and advice from the digital tutors tutorial this got me off to a good start allowing me to create a range of rock from small, medium and large. Currently working on a mound of rocks which will allow me to blend them in better. 


I created the high poly in Zbrush and from there used decimation master to create the low which I tidied up in max before creating UV's and finally baking in x-normals. 


The images above show the low poly with the Normal and AO baked in marmoset toolbag 2.

Sunday, 27 December 2015

MK1_Interior_Workflow_Part_4

 Part 4 of the interior Shows some final Renders of my textured objects.


Gear Stick


Pedal Box 


Hand Brake Missing the second shader


Dash Gadgets


Dash Board